Location: Assets/Plugins/Animancer/Examples/06 State Machines/02 Interruptions
Recommended After: Characters and Doors
Learning Outcomes: in this example you will learn:
How a modular state machine setup makes it easy to add new states.
How to control which states can interrupt each other.
This example expands upon the Characters example to add a FlinchState and demonstrates several different ways you can control which states can interrupt each other.
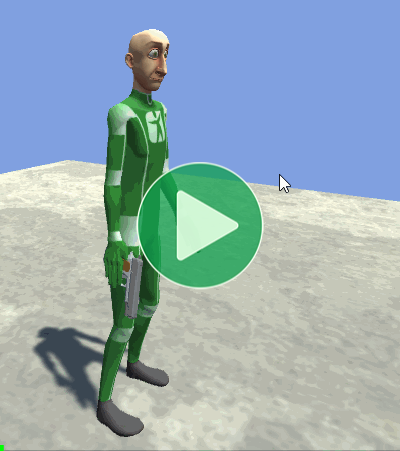
The video to the right shows how the Action (shooting the pistol) can interrupt Idle or Walk and clicking on the character to make them Flinch can interrupt any of those, but clicking elsewhere during the Flinch isn't allowed to start the Action.
Summary
Animancer will always play an animation when you tell it to, so it's up to your scripts to decide when each one can be played. This example demonstrates some of the ways you can manage that logic:
- A
boolto indicate whether each state can be interrupted is simple, but doesn't work if you need a state to be interruptable by some things and not others. - An
intto indicate priority is a bit more flexible, but doesn't give any clear meaning to specific values. - An
enumcan be used like anintand gives each value a specific name (low, medium, high, etc.). - Rather than straight up priority, an
enumcould have values for general types of states such as Idle, Attack, and Die.
Controls
- W = Walk
- Left Click on the character = Get Hit
- Left Click elsewhere = Shoot
Overview
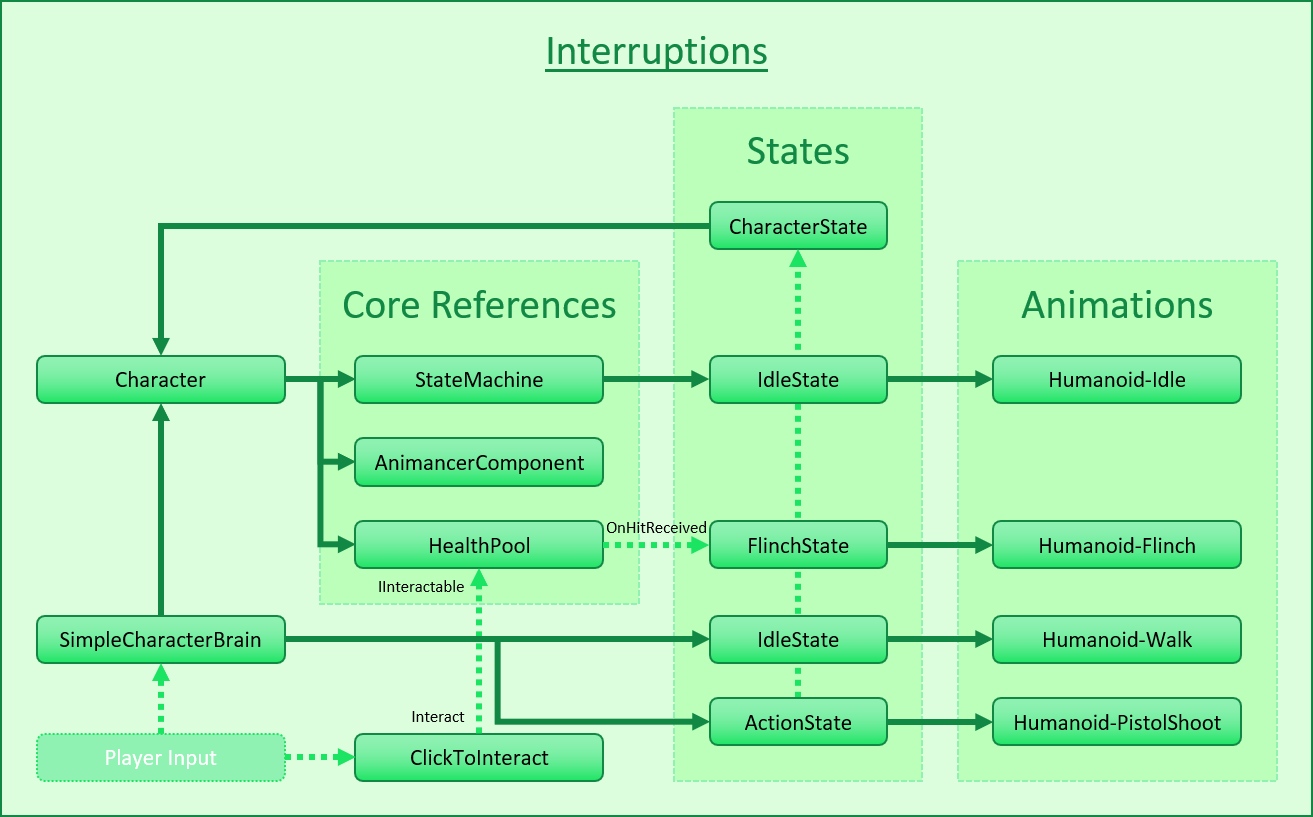
This example explains various different ways of controlling which states can interrupt each other, including the CharacterStatePriority enum used in the actual scripts. But the states in the Characters example are a bit too simple to really explore that concept so before it can do that it explains how to implement a FlinchState which interrupts a character's other actions. A state like that would normally be triggered when the character gets hit by an attack, but rather than getting sidetracked implementing a proper attack and damage system, this example just reuses the interaction system from the Doors example:
- On startup,
FlinchStategets the character'sHealthPooland registers a callback in itsOnHitReceivedevent. That callback will tell the character to enter theFlinchState. ClickToInteractlooks for a component that implementsIInteractableattached to whatever object is clicked. If it finds one, it callsInteracton it.- The character's
HealthPoolcomponent implementsIInteractable. ItsInteractmethod invokes anOnHitReceivedevent as if the character had taken damage.
The general code structure is the same as the Characters example with a few additions. The modular design of the character's scripts allows the new state to be added without modifying any of the previous scripts.
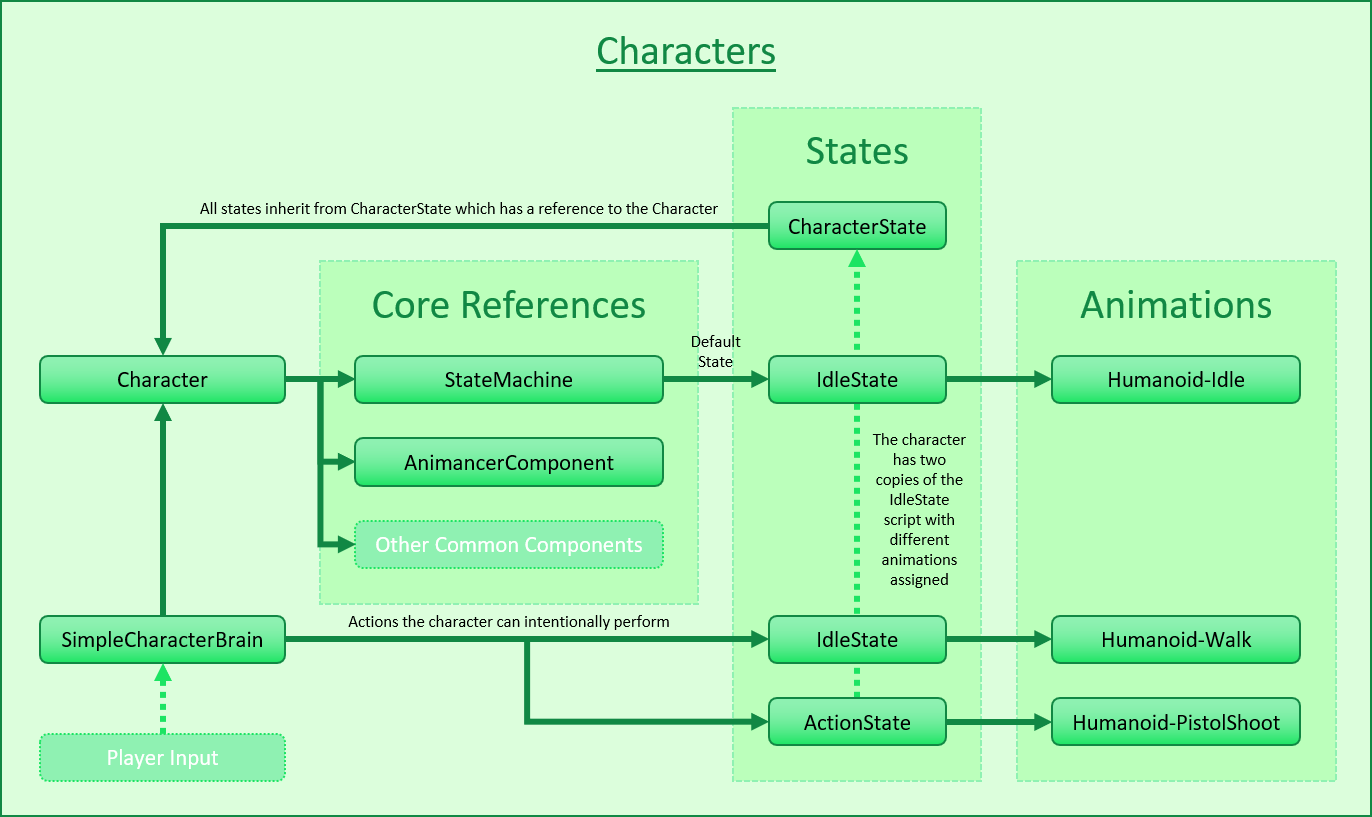
Click here to show the code structure from the Characters example:
Note how nothing directly references the FlinchState. It registers itself to the event that will activate it so it's entirely self-contained and nothing else needs to know whether it's there or not. That means determining whether a character will flinch when they take damage is as simple as adding or removing that one component.
Health Pool
The Character class has a field to reference a HealthPool which wasn't used in the Characters example, but will be used here:
public sealed class Character : MonoBehaviour
{
    ...

    [SerializeField]
    private HealthPool _Health;
    public HealthPool Health => _Health;

The HealthPool class is very simple:
- It has an Event Delegate called
OnHitReceivedwhich would normally be triggered when the character is hit by an attack. - But since we don't have a hit/damage system (and implementing one would be very off-topic), it implements
IInteractablefrom the Doors example using itsInteractmethod to invoke the event. - There is also a
ClickToInteractcomponent in the scene which will call thatInteractmethod when the user clicks on the character.
public sealed class HealthPool : MonoBehaviour, IInteractable
{
    public event Action OnHitReceived;

    public void Interact()
    {
        OnHitReceived?.Invoke();
    }
}
Normally, that class would also have fields like maximum health and current health to keep track of how much damage the character takes.
Using events and interfaces allows this class to do its job without knowing what's interacting with it or what's reacting to it getting hit. The ClickToInteract component wasn't written with HealthPool in mind and FlinchState doesn't know or care what's causing the character to get hit, they all just fit together while operating independently.
Flinch State
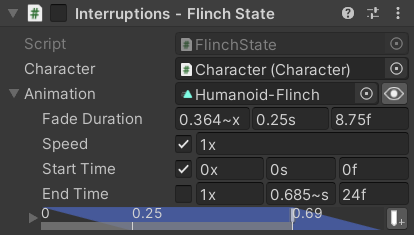
The FlinchState script is very similar to the Action State:
- Has a Transition field.
- Sets its End Event return to the default state (Idle) when the animation finishes.
- Plays that Transition when the state is entered.
public sealed class FlinchState : CharacterState
{
    [SerializeField] private ClipTransition _Animation;

    private void Awake()
    {
        _Animation.Events.OnEnd = Character.StateMachine.ForceSetDefaultState;

        ...
    }

    private void OnEnable()
    {
        Character.Animancer.Play(_Animation);
    }
The other properties determine which states it can interrupt and which ones it can be interrupted by, which will be explained soon:
    public override CharacterStatePriority Priority => CharacterStatePriority.High;

    public override bool CanInterruptSelf => true;
}
And the bit that allows it to operate independently is that it also registers a Lambda Expression delegate to the OnHitReceived event in the HealthPool component. When that event is triggered, it will invoke the registered delegate which tries to enter this state:
    private void Awake()
    {
        ...

        Character.Health.OnHitReceived += () => Character.StateMachine.TryResetState(this);
    }
It uses TryResetState rather than TrySetState so that it can re-enter itself, allowing the character to restart the Flinch animation if they get hit again while it was already playing (which might be undesirable in some games).
Interrupt Behaviour
Now that the FlinchState has been implemented, it's time to explain some different ways of controlling which states can interrupt each other. Here's a summary of the logic we want:
| State | Can be interrupted by |
|---|---|
IdleState |
Any state. |
WalkState |
Any state. |
ActionState |
ActionState, FlinchState. |
FlinchState |
FlinchState. |
Can Exit State
In simple situations, you might be able to implement an interruption management system by overriding CanExitState to directly indicate whether a state can be interrupted:
public sealed class ActionState : CharacterStae
{
    public override bool CanExitState => false;
That means any attempt to TrySetState or TryResetState will fail, but ForceSetState will still succeed (because it ignores that property). So the action can't be interrupted normally, but its End Event would still return to the default IdleState properly since it uses ForceSetDefaultState:
    private void Awake()
    {
        _Animation.Events.OnEnd = Character.StateMachine.ForceSetDefaultState;
    }
Unfortunately, that approach is too simple for this example because we want ActionState to allow interruptions by FlinchState without allowing interruptions by IdleState.
Priority Int
You could use an int where higher values allow a state to interrupt ones with lower values:
public abstract class CharacterState : StateBehaviour
{
    public virtual int Priority => 0;// All states default to 0 unless they override it.

    public override bool CanExitState
    {
        get
        {
            // There are several different ways of accessing the state change details:
            //var nextState = StateChange<CharacterState>.NextState;
            //var nextState = _Character.StateMachine.NextState;
            var nextState = this.GetNextState();
            return nextState.Priority >= Priority;
        }
    }
}

public sealed class ActionState : CharacterState
{
    public override int Priority => 1;
}

public sealed class FlinchState : CharacterState
{
    public override int Priority => 2;
}
The Changing States page explains the different ways of accessing the next state in more detail.
Priority Enum
An int can hold a wide range of values and a character won't have that many different states so it might be cleaner to use an Enum like this:
public enum CharacterStatePriority
{
    // Enums are ints starting at 0 by default.
    Low,// Could specify "Low = 0," if we want to be explicit or change the order.
    Medium,// Medium = 1,
    High,// High = 2,
    // This means you can compare them with numerical operators like < and >.
}
The CanExitState property would be completely identical to the Priority Int approach above, while the Priority property uses the enum:
public abstract class CharacterState : StateBehaviour
{
    public virtual CharacterStatePriority Priority => CharacterStatePriority.Low;
}

public sealed class ActionState : CharacterState
{
    public override CharacterStatePriority Priority => CharacterStatePriority.Medium;
}

public sealed class FlinchState : CharacterState
{
    public override CharacterStatePriority Priority => CharacterStatePriority.High;
}
Self Interruption
The Priority Int and Priority Enum approaches above allow a state change if nextState.Priority >= previousState.Priority which would achieve the desired behaviour for this example, but only because the ActionState and FlinchState both want to be able to interrupt themselves. It's far more common for actions to not be able to do that, but if we simply changed the >= to > then the IdleStates (and the MoveState which will be introduced in the Brains example) wouldn't be able to interrupt each other.
A simple solution is to add a CanInterruptSelf property and make CanExitState a bit more complicated:
public virtual CharacterStatePriority Priority => CharacterStatePriority.Low;

public virtual bool CanInterruptSelf => false;

public override bool CanExitState
{
    get
    {
If the next state is actually this state, use the value of CanInterruptSelf:
        var nextState = _Character.StateMachine.NextState;
        if (nextState == this)
            return CanInterruptSelf;
All the Low priority states should be interruptable by anything:
        else if (Priority == CharacterStatePriority.Low)
            return true;
Otherwise, compare the Priority of each state and don't allow interruptions by the same Priority:
        else
            return nextState.Priority > Priority;
    }
}
This is the solution used in the actual example scripts:
public abstract class CharacterState : StateBehaviour
{
    public virtual CharacterStatePriority Priority => CharacterStatePriority.Low;
    public virtual bool CanInterruptSelf => false;
}

public sealed class ActionState : CharacterState
{
    public override CharacterStatePriority Priority => CharacterStatePriority.Medium;
    public override bool CanInterruptSelf => true;
}

public sealed class FlinchState : CharacterState
{
    public override CharacterStatePriority Priority => CharacterStatePriority.High;
    public override bool CanInterruptSelf => true;
}

public sealed class AttackState : CharacterState// From the Weapons example.
{
    public override CharacterStatePriority Priority => CharacterStatePriority.Medium;
    // CanInterruptSelf defaults to false from the base class.
}

public sealed class EquipState : CharacterState// From the Weapons example.
{
    public override CharacterStatePriority Priority => CharacterStatePriority.Medium;
    // CanInterruptSelf defaults to false from the base class.
}
Action Type
A linear priority based system allows you to manage interruptions in a standardised manner without anything caring about the specific states involved, however it can often be more straightforward to use a CharacterStateType enum such as:
public enum CharacterStateType
{
    Idle,
    Walk,
    Run,
    Jump,
    Action,
    Skill,
    Flinch,
    Die,
}
Then you can override the CanExitState property in any state to allow and restrict specific categories as necessary. For example:
public sealed class ActionState : CharacterState
{
    public override bool CanExitState
    {
        get
        {
            switch (this.GetNextState<CharacterState>().Type)
            {
                case CharacterStateType.Flinch:
                case CharacterStateType.Die:
                    return true;

                default:// Any other value.
                    return false;
            }
        }
    }
}
For this example, case CharacterStateType.Action would also need to return true to allow rapid firing while most actions usually can't interrupt themselves so the specific logic you need will always depend on the situation.
Serialized Field
Instead of using virtual properties, the above approaches could have used Serialized Fields:
public abstract class CharacterState : StateBehaviour
{
    [SerializeField]
    private CharacterStatePriority _Priority;
This would mean that you need to select the desired value in the Inspector every time you set up a state component, but would allow you to potentially reuse a state with a different priority. For example, you might want an ActionState that operates the same as usual but can't be interrupted even by FlinchState so you could just give it a higher priority.
Conclusion
The actual example scripts use the Priority Enum approach with the Self Interruption system since it's just complex enough to achieve the desired logic without any unnecessary complexity beyond that. Keeping your code open to future expansions and changes is valuable, but it can also be useful to choose a solution that closely meets the requirements of your situation without wasting time and effort supporting potential features that you don't end up needing.
What Next?
| Example | Topic |
|---|---|
| Brains | A deeper look into the concept of character brains. |
| Platformer Game Kit | A separate (free) package which demonstrates a much more complete character implementation for a 2D platformer game. Despite having a much more complex character than this example, it's able to achieve the desired logic by simply overriding Can Exit State without needing any of the more complex options presented here. |
| 3D Game Kit | A more complex character framework based on Unity's 3D Game Kit Lite. |