Location: Assets/Plugins/Animancer/Examples/04 Directional Sprites/02 Directional Character
Recommended After: Directional Basics
Learning Outcomes: in this example you will learn:
How to use Directional Animation Sets with more complex behaviour.
How the code for a character with 4 directions also works for one with 8 directions.
This example demonstrates how you can use Directional Animation Sets in a slightly more complex character than the Directional Basics example and then make a character using DirectionalAnimationSet8s to support diagonal movement as well, without changing the script at all.

Created by Chasersgaming
CC0 Licence
Note that this video is a little different from the actual example scene. It has disabled the camera movement because the delta based compression used by GIFs isn't effective when the entire image is moving (causing the video file to be far larger than any of the other examples).
Summary
- Using the
AnimationSet.Snapmethod to clamp your input vector to the nearest direction included in the set allows you to support 4 or 8 directions without hard coding things to a specific number of directions. TimeSynchronizationGroups allow you to easily synchronize theNormalizedTimeof related animations when you switch between them.
Overview
The general code structure is basically just a more complex version of the Directional Basics example:
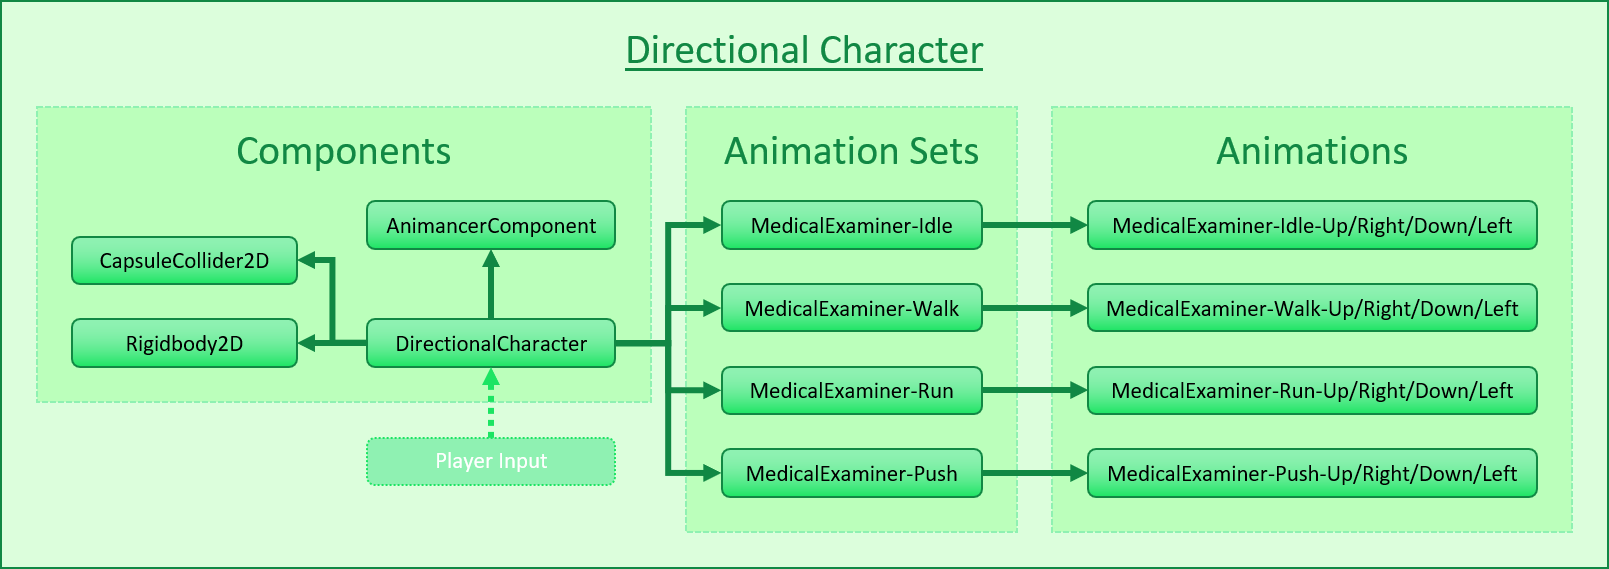
There are two characters in this example:
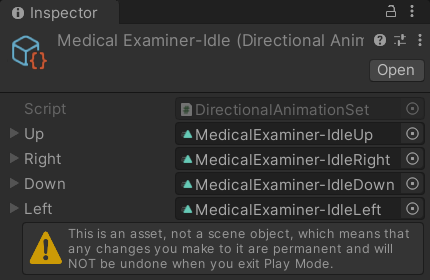
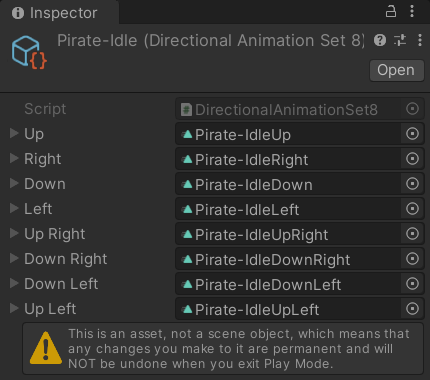
- The Medical Examiner has 4 directional animations for each of the animation sets as shown above.
- The Pirate has 8 of each (the same 4 and diagonals between them).
This is one of the major advantages Animancer has over Mecanim: you can define data structures to suit your needs and reuse them throughout your projects instead of trying to manually duplicate a particular pattern in an Animator Controller and being unable to easily refactor or extend what you have made.
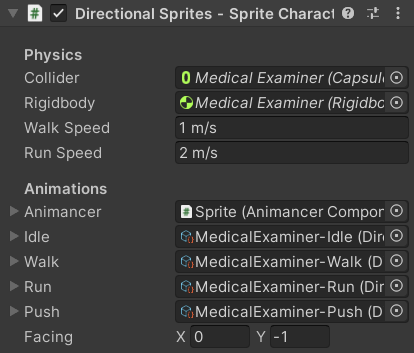
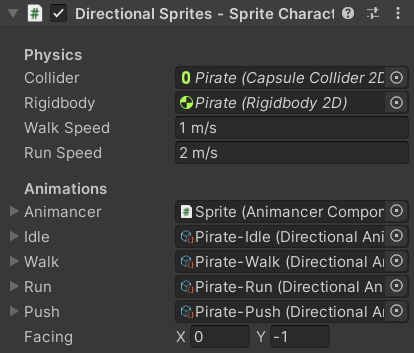
Fields
[Header("Physics")]
[SerializeField] private CapsuleCollider2D _Collider;
[SerializeField] private Rigidbody2D _Rigidbody;
[SerializeField] private float _WalkSpeed = 1;
[SerializeField] private float _RunSpeed = 2;

[Header("Animations")]
[SerializeField] private AnimancerComponent _Animancer;
[SerializeField] private DirectionalAnimationSet _Idle;
[SerializeField] private DirectionalAnimationSet _Walk;
[SerializeField] private DirectionalAnimationSet _Run;
[SerializeField] private DirectionalAnimationSet _Push;
[SerializeField] private Vector2 _Facing = Vector2.down;
- We have quite a few Serialized Fields, so the
[Header]attribute allows us to group them under an appropriate headding in the Inspector. DirectionalAnimationSet8Inherits from the baseDirectionalAnimationSetso either type of asset can be assigned to theDirectionalAnimationSetfields. This allows the same script to be used for both the Medical Examiner (4 directions) and Pirate (8 directions).
| Medical Examiner | Pirate |
|---|---|
 |
 |
 |
 |
States
As you can see from the fields above, these characters have four states: Idle, Walk, Run, and Push.
Idle
Idle will be used when the player is not trying to move. This is similar to the Directional Basics example, except that this time we are storing the input vector and animation set so that we can determine how to apply the Movement.
private Vector2 _Movement;
private DirectionalAnimationSet _CurrentAnimationSet;

private void Update()
{
    _Movement = ExampleInput.WASD;
    if (_Movement != default)
    {
        _Facing = _Movement;
        UpdateMovementState();// See Below.

        _Movement = _CurrentAnimationSet.Snap(_Movement);
        _Movement = Vector2.ClampMagnitude(_Movement, 1);
    }
    else
    {
        Play(_Idle);
    }
}

private void Play(DirectionalAnimationSet animations)
{
    _CurrentAnimationSet = animations;
    _Animancer.Play(animations.GetClip(_Facing));
}
Unlike the Directional Basics example, this time we have several different possible animations to use when moving so the decision of which one to use is handled by a separate method:
Updatedecides whether to move or not and gathers the details that will be necessary to physically move the object.UpdateMovementStatedecides which movement animation to actually use.
This way we avoid putting too many responsibilities in a single method.
Push
When moving, Push logically takes priority over the other two if you are moving against a solid object so start by detecting if that is currently happening. We need to know what the character is touching so we want to use _Collider.GetContacts to get the current contact details. Unity 2019.1 added an Overload of the GetContacts method which takes a List parameter that it can automatically resize as necessary for the current number of contact points, but since Animancer still supports older Unity versions we still need to use the Array based methods. In order to avoid creating Garbage, we want to pre-allocate an array large enough to fit all the contact points we might have. 4 contacts is plenty for this example, but even a large number like 64 would be fine as long as we avoid making a new array every time we need to get the contacts.
private static readonly ContactPoint2D[] Contacts = new ContactPoint2D[4];

private void UpdateMovementState()
{
    var contactCount = _Collider.GetContacts(Contacts);
Note that GetContacts returns the actual number of contact points it filled in the array so when we iterate through them we only want to check that many instead of iterating through the entire Contacts.Length:
    for (int i = 0; i < contactCount; i++)
    {
The ContactPoint2D struct contains various details such as the point of contact and the collider that we are touching, but all we are interested in is the normal which is a Vector2 that tells us which direction the collision is comming from. By comparing the angle between that vector and our movement direction, we can determine if we are actually trying to move towards that object to push it or just brushing past it:
- If they are 180 degrees apart, we are moving straight towards the object and want to push it.
- If they are 90 degrees apart, we are moving past the object and do not want to push it.
- 135 degrees is halfway between those two and could work either way, but since you are moving diagonally across the surface of the object you probably want to move rather than push it.
- So 150 degrees or more was decided as the threshold for pushing an object. The code is written as
180 - 30since it is a bit clearer that we want to be within30degrees rather than simply writing150. Note that since both numbers are Constants, the compiler will perform the subtraction at compile-time rather than needing to do it every time the method is executed at runtime (not that this single operation would have any real effect on the performance of your game either way).
        if (Vector2.Angle(Contacts[i].normal, _Movement) > 180 - 30)
        {
So if we determine that the angle is right for pushing, we play the appropriate animation and return immediately so it does not execute the rest of the method.
            Play(_Push);
            return;
        }
    }

    // The UpdateMovementState method continues below.
You might also consider checking whether the colloding object has a Rigidbody2D that you can actually push (or some other component to mark it as "pushable"), but in this example we do not mind playing the Push animation when moving against a wall.
Walk and Run
If the character is not trying to Push anything, we choose between Walk and Run based on whether or not the player is holding Left Shift using a Conditional Operator:
    var isRunning = ExampleInput.LeftShiftHold;
    Play(isRunning ? _Run : _Walk);
}
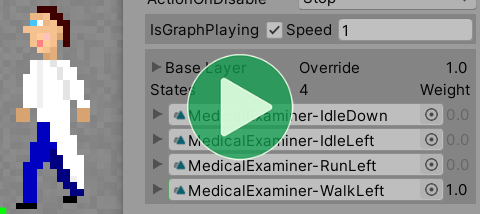
Synchronization
With the implementation so far, every time the character changes between Walk and Run, it will re-start from the beginning of the new animation. The problem is not usually too obvious with animations like these which only have a small number of frames, but in smoother animations it can be very jarring when a character snaps from one part of the Walk cycle to a totally different part of the Run cycle. In the worst case, repeatedly swapping between Walk and Run would only let it play the start of each animation before swapping again.
This problem can be avoided by synchronizing the time of the previous and next animations:
| Not Synchronized | Synchronized |
|---|---|
 |
 |
| Every animation change starts from the beginning. | Changing animations continues from the current point in the walk cycle. |
A basic implementation only needs two additions to our Play method:
private void Play(DirectionalAnimationSet animations)
{
- Store the
Timeof the current state:
var time = _Animancer.States.Current.Time;
- Play the new animation just like before:
    _CurrentAnimationSet = animations;
    _Animancer.Play(animations.GetClip(_Facing));
- Set the
Timeof the new state:
    _Animancer.States.Current.Time = time;
}
But there are a couple of problems with that implementation:
- It won't actually work because the first time
Playis called the current state will benullso it will just cause an exception. That would be easy to fix. - Setting the
Timeof an animation will actually ensure that it stays at that value after the next animation update (in this case, that will be before the current frame renders). That means if you were to alternate between Walk and Run every single frame, the time would never actually get to advance. That could be solved by addingTime.deltaTimemultiplied by theSpeedof the state to the value we set. - It assumes both animations are the same length. They are in this example, but that won't always be the case. That could be fixed by using
NormalizedTimeinstead, which would also complicate the way we need to adddeltaTimea bit more. - It synchronizes all animations. We want to synchronize Walk and Run, but when we go from Idle to Walk we don't really care what time the Idle was at and if we had another action such as Open Door then we definitely wouldn't want it to skip halfway into that animation based on the Walk cycle. There are plenty of ways that problem could be addressed, but we just keep adding complexity to this system.
These issues could be addressed by using a Blend Tree or Mixer like in the Linear Blending example since they already have Synchronization built-in, but using them alongside DirectionalAnimationSets isn't particularly convenient.
Instead, we can make a TimeSynchronizationGroup which we initialize in Awake by telling it what we want it to synchronize (Walk, Run, and Push, but not Idle):
private TimeSynchronizationGroup _MovementSynchronization;

private void Awake()
{
    _MovementSynchronization = new TimeSynchronizationGroup(_Animancer) { _Walk, _Run, _Push };
}
Then our Play method can use it in much the same way as the basic implementation:
private void Play(DirectionalAnimationSet animations)
{
    // Store the time if the _CurrentAnimationSet is in the group:
    _MovementSynchronization.StoreTime(_CurrentAnimationSet);

    _CurrentAnimationSet = animations;
    _Animancer.Play(animations.GetClip(_Facing));

    // Apply the stored time if the newly assigned _CurrentAnimationSet is also in the group:
    _MovementSynchronization.SyncTime(_CurrentAnimationSet);
}
Movement
Since the character only has animations for a specific set of directions, we want to only allow them to move in those exact directions (this will not always be the case, it is a stylistic choice for you to decide how your game looks and feels):
- The Medical Examiner only has 4 directions so we do not want them to move diagonally.
- The Pirate has 8 directions which is all a keyboard can really do, but if the player were to use a controller joystick we could receive input from any angle so we still want to limit them to the available animations.
This script does not actually know how many directions the character supports, but it can simply ask the DirectionalAnimationSet to Snap the movement vector to the closest supported direction:
// in Update when moving:
// Note that Snap returns the modified vector, it does not modify the input directly.
_Movement = _CurrentAnimationSet.Snap(_Movement);
Using the _CurrentAnimationSet to snap the direction has the added benefit of allowing individual actions to have differing numbers of supported directions. For example, your character might have 8 directions for most actions but only 4 for interacting with a specific object. Or you could even make a DirectionalAnimationSet1 if you only have a single animation for an object that always has the same orientation such as pushing open a large boss door which will always be facing straight at the screen.
Holding multiple directions on a keyboard to move diagonally gives you a longer input vector than only holding a single direction ((1, 0) has a Magnitude of 1 while (1, 1) has a Magnitude of about ~1.414... This would cause the character to move faster diagonally than other directions which we do not want, so we can simply use Vector2.ClampMagnitude to shorten the input vector if it is too long:
_Movement = Vector2.ClampMagnitude(_Movement, 1);
Now that we know which direction we want to move we just need to do it. Physical movement is something that should be as consistent as possible, so we want to update it at a fixed rate rather than allowing it to vary based on the rendering frame rate. Using a Rigidbody2D means Unity will already update it at a fixed rate so the following code could simply go at the end of the Update method and would achieve the exact same result. The distinction is much more important if you are applying gradual acceleration which will give slight differences depending on how you apply it.
private void FixedUpdate()
{
    var speed = _CurrentAnimationSet == _Run ? _RunSpeed : _WalkSpeed;
    _Rigidbody.velocity = _Movement * speed;
}
Pixel Perfect
Pixel art tends to not look very good if the pixels of the characters and other objects do not line up with each other, but fortunately the PixelPerfectCamera in Unity's 2D Pixel Perfect package can easily solve this problem. That system has no direct interaction with animations so you can simply follow its instructions to use it normally.
| Regular | Pixel Perfect |
|---|---|
| You can see a gap smaller than a pixel between the crate and the wall. | The crate is physically in the same position, but visually it looks correctly snapped to the nearest pixel. |
Edit Mode
In order to ensure that the SpriteRenderer shows the correct Sprite in Edit Mode once we assign the animations to our script, it has basically the same OnValidate method used in the Directional Basics example, except that this time we use AnimancerUtilities.EditModePlay so we can see the Idle animation actually playing in Edit Mode rather than only showing its first frame.
#if UNITY_EDITOR
private void OnValidate()
{
    if (_Idle != null)
        _Idle.GetClip(_Facing).EditModePlay(_Animancer);
}
#endif

Sub-Assets
Since the there are lots of animations in this example and they are each only used by a single DirectionalAnimationSet, the Drag and Drop Sub-Assets feature of Inspector Gadgets Pro was used to turn the animations into sub-assets of the set in order to organise them a bit better.
Conclusion
Click here to see the full DirectionalCharacter script.
using Animancer;
using UnityEngine;

public sealed class DirectionalCharacter : MonoBehaviour
{
    [Header("Physics")]
    [SerializeField] private CapsuleCollider2D _Collider;
    [SerializeField] private Rigidbody2D _Rigidbody;
    [SerializeField] private float _WalkSpeed = 1;
    [SerializeField] private float _RunSpeed = 2;

    [Header("Animations")]
    [SerializeField] private AnimancerComponent _Animancer;
    [SerializeField] private DirectionalAnimationSet _Idle;
    [SerializeField] private DirectionalAnimationSet _Walk;
    [SerializeField] private DirectionalAnimationSet _Run;
    [SerializeField] private DirectionalAnimationSet _Push;
    [SerializeField] private Vector2 _Facing = Vector2.down;

    private Vector2 _Movement;
    private DirectionalAnimationSet _CurrentAnimationSet;
    private TimeSynchronizationGroup _MovementSynchronization;

    private void Awake()
    {
        _MovementSynchronization = new TimeSynchronizationGroup(_Animancer)
        { _Walk, _Run, _Push };
    }

    private void Update()
    {
        _Movement = ExampleInput.WASD;
        if (_Movement != default)
        {
            _Facing = _Movement;
            UpdateMovementState();

            _Movement = _CurrentAnimationSet.Snap(_Movement);
            _Movement = Vector2.ClampMagnitude(_Movement, 1);
        }
        else
        {
            Play(_Idle);
        }
    }

    private void Play(DirectionalAnimationSet animations)
    {
        _MovementSynchronization.StoreTime(_CurrentAnimationSet);

        _CurrentAnimationSet = animations;
        _Animancer.Play(animations.GetClip(_Facing));

        _MovementSynchronization.SyncTime(_CurrentAnimationSet);
    }

    private static readonly ContactPoint2D[] Contacts = new ContactPoint2D[4];

    private void UpdateMovementState()
    {
        var contactCount = _Collider.GetContacts(Contacts);
        for (int i = 0; i < contactCount; i++)
        {
            if (Vector2.Angle(Contacts[i].normal, _Movement) > 180 - 30)
            {
                Play(_Push);
                return;
            }
        }

        var isRunning = ExampleInput.LeftShiftHold;
        Play(isRunning ? _Run : _Walk);
    }

    private void FixedUpdate()
    {
        var speed = _CurrentAnimationSet == _Run ? _RunSpeed : _WalkSpeed;
        _Rigidbody.velocity = _Movement * speed;
    }

#if UNITY_EDITOR
    private void OnValidate()
    {
        if (_Idle != null)
            _Idle.GetClip(_Facing).EditModePlay(_Animancer);
    }
#endif
}
Even with only Idle, Walk, Run, and Push animations, that script is quite long and would become harder and harder to maintain if you started adding more things the character can do. The State Machines examples demonstrate a much better way of structuring complex characters which requires a bit more effort to set up initially, but makes things easier to modify and debug which saves much more effort later on.